Thursday, December 31, 2015

Is 2016 Your Year?

32 comments:

We all know January is the time for a New Year, A New You, and New Years Resolutions.

Do you remember what your resolutions were last year? Did you achieve them? If you didn’t achieve your 2015 revolutions or don’t even remember them, don’t worry - you’re not alone.

So how can you make 2016 different? Find something that is so inspiring to you, you are filled with the drive to make change happen. Every time you find yourself putting your goals on the back burner return to your inspiration to push through that wall.

So what inspires you? How do you find that thing which will help you become that person you’ve always dreamed of?

Over a year ago, we were in a transition time of leaving Hawaii and moving to California. One day I was driving the car around to get my 2 year old son to take a nap. I saw Jim Carrey's Commencement Address at the 2014 MUM (Maharishi University of Management) Graduation and was interested. I played it in the car as I drove, which was great because I had no other distractions and could fully listen. Within minutes I was completely absorbed in his words.


You can listen to the full speech here:


Here are a few of my favorite parts:

“Fear is going to be a player in your life, but you get to decide how much. You can spend your whole life imagining ghosts, worrying about your pathway to the future, but all there will ever be is what’s happening here, and the decisions we make in this moment, which are based in either love or fear.”

“You can fail at what you don’t want, so you might as well take a chance on doing what you love.”

“Everything you gain in life will rot and fall apart, and all that will be left of you is what was in your heart.”

“Your job is not to figure out how it’s going to happen for you, but to open the door in your head and when the doors open in real life, just walk through it. Don’t worry if you miss your cue. There will always be another door opening. They keep opening.”


For me this speech always re inspires me on how to follow my passion. My 2016 goal is to focus on my small business; inspiring and helping others to live a active, healthy, and happy life.

This speech may not be what inspires you to change your lifestyle, set new years resolutions, or achieve your resolutions. But there is something out there that will. So start searching and live your life to the fullest.

What will you achieve in 2016?


Wednesday, December 30, 2015

Book Review: Letter From Alabama, by David Workman

15 comments:

When I got this review assignment, I thought “Why not, I love to read!” and I was actually very, very excited to have a “real” book in my hands again. 
 
I made the switch to ebooks a while back for many reasons - with the constant moving that comes with the military life, it just simply means less boxes to pack and less luggage when flying back home.  However, I forgot how good it feels to hold a real book in your hands, to actually flip pages and of course the unique smell of books!
 
The book Letter from Alabama, by David Workman, has a beautiful cover that's not too thick, the pages are made from a great quality paper, written in a clear fond and a good letter size. The book is a little bigger in size than most other “real” pocket books I previously owned but not so big that it would be an inconvenience. The book has 212 pages.

When I first held the book in my hand I wasn't so sure what to expect from the story.
What I knew about it was:
  • It is a true story
  • There must be a very important letter involved
  • The author was very nice in the email communication
  • I was excited to read this book
The book starts with special acknowledgments which instantly lets you picture a large family full of support. The following page is the Table of Contents with all the chapters listed, etc.

The next page is Why This Story Is Written and I will quote it here because this is a beautiful, very short Summary of what this story really is about. This page set the entire mood for reading this book.

This is the story of a little boy and an infant girl abandoned, and of a family and complete strangers who acted to save them both.
It's the story of human failure, and human triumph.
Forgiveness and redemption.
This story is written as a testament to, and a prayer of thanks for, good and decent people everywhere who stand up for a child when they don't have to – when they have nothing to gain and perhaps much to lose.
It's a tribute to those who see the potential in a young person and give that person a chance to be the best that he or she can be. They are the heroes for whom this story is now committed to writing. 
 
David L. Workman
Olympia, Washington
United States of America
February, 2015

The book starts with a lot of very detailed explanations about connections between different people, different places, and moves. You will also find a lot of information about the different families histories and details about the situation back then which sometimes feels like history lessons. 

I really had a hard time to get through the first few chapters because to me it seemed confusing at times and it was just SOOOO much information and history. It also included many dates and information about individuals. 

At the end of the book I realized that there are Maps and a Timeline Of Events in the very back which helps sort it out and clarifies it. 

The story itself is full of wonderful happy memories and at times very tragic and sad ones. I really enjoyed all the family pictures that were at the end of almost every chapter and the collection of family photos in the back of the book. 


I also enjoyed some of the more intimate historical details, such as an explanation in Chapter 4 of how cloth diapering worked a few decades ago.
 
What also deserves mentioning is the courage the people in the book show. There are a series of family difficulties that eventually lead to the disappearance of Davy (the author) and his father George - I will leave how that came to be as a secret for the reader. 

Going above and beyond to reunite; forming two wonderful families that connect in so many wonderful ways and share such precious – and sometimes sad – memories. 

The title has to do with a letter that was published in a local newspaper that led to relocating the missing Davy, but there is so much more involved in the story of this family.  The later chapters describe numerous people in the author's adolescence and young adulthood that help, in large and small ways, him to grow into the man he's become.


The descriptions are good but at times can be overwhelming.

My personal opinion about this memoir is that it is a great, very detailed travel back in time. The pages are filled with details over details. 

Even so, the story is also well written and the language used not too complicated. As someone with a limited vocabulary in the English language (my native language is German) and a high school reading level, I didn't have trouble reading and understanding the story. 
 
I found Letter From Alabama very inspirational, but at times the details were a little overwhelming. What I – personally – also didn't like too much was the mentioning of churches and religion, which happened quite often. That said, I am sure many others would appreciate that greatly and I do realize that this is an accurate reflection of the culture the author and his family lived in, as well as an important aspect of many of the author's likely readers.

Overall I liked the book. 

 
Generally, I am more the fantasy fiction kinda person rather than nonfiction memoir, but Letter From Alabama was good read, and I would recommend as a book for people who seek inspiration, who enjoy books based on true stories and who need a reminder that there are still good people in this world who selflessly do good to improve someone else situation. Who doesn't need that now and then?
 
This book is also a good reminder for what family and community are about – sticking together and loving unconditionally. 


https://www.workman-inc.com/
https://www.facebook.com/letterfromalabama


Tuesday, December 29, 2015

Braided Spaghetti Roll

17 comments:

Have I got a simple and easy way to make your spaghetti dinner a little more interesting! I present to you the Braided Spaghetti Roll..

There is only so many times a month you can have pasta, am I right? Well, I decided to switch it up tonight with this great recipe! You take your normal spaghetti recipe, add a little cheese and wrap it up in pizza dough and bake! Woo, easy!!

I bought the store bought pizza dough that you can find with the biscuits and crescent rolls... I made spaghetti for about 1 person (serving size).. and a few handfuls of mozzarella cheese (or as much as you like).

Baked Spaghetti Roll

1 store bought Pizza Dough
1 cup Spaghetti sauce (meat included)
1 cup Mozzarella Cheese
1 Handful of Spaghetti noodles ( enough for 1 serving)
1 egg white
Parmesan Cheese (a few teaspoons to sprinkle on top)
Garlic salt, to taste


Make up your spaghetti as you normally would, and mix all the sauce together with noodles.

Roll out your dough to a full square sheet. This is easiest done on parchment paper for easy transfer to a greased cookie sheet. (I made the mistake of using plastic wrap, ugh, nightmare!)

Turn your spaghetti into the center of the dough. Sprinkle the cheese over the top of the pasta (Don't forget this step as it is really hard to unroll once you have started. Ask me how I know...).

Once your spaghetti is on the dough, cut slits in the dough about 3 inches apart.

Then starting on one side of the roll, gently pull the first cut piece of dough and fold over the pasta. Continue on throughout the loaf intertwining the pieces. Eventually you should be completely covered.

Brush on some egg whites onto the top and sides, sprinkle with some Parmesan cheese and a light dusting of garlic salt. Bake for 30-35 minutes at 350 degrees.


There you go! Easy as pie, or pizza would be a better analogy! Enjoy!


Review/Giveaway: Dive in Deck

42 comments:
Dive in Deck: 33 Cards to Ignite & Inspire Deeper Dialogue.
I am very excited to share this wonderful little inspiration / conversation sparker deck with you!  According to their website:
Dive In Deck is like a cosmic permission slip to put down your devices and DIVE IN to deep and meaningful connection with your Self and others. Each unique conversation card features an igniting question or statement paired with inspiring visual art, serving as an access point for inquiry & exploration. There are no rules, every answer is right, and evolution is totally allowed. Choose a card and DIVE IN!”

This is right up my alley of interest! I’ve been saying for years how hard it is for me to engage in “the normal” conversations. And these cards offer the sort of inspiration for deep dialogue on the sort of topics that get me charged up. Sign me up!!!


The deck is a collaboration between the Heather, Jessie, and Kristina, three ladies who are ambassadors in the Connection Revolution.

I would love to sit around a fire with them and go through these cards. I love sharing conversations with like minded people and find such deep discussion empowers us to follow what is next for each of us. I believe daily conversation should lift us up, inspire us, and challenge us to do something better. You can’t say the daily gossip or drama quite does that.

There are endless ways these cards could be used. On their page, several ideas are listed, including:

• SPICE UP YOUR DATE NIGHT
• MAKE A NEW PAL
• GO DEEPER WITH A BESTIE
• MEDITATE ALONE OR TOGETHER
• BRING THEM TO THE PARTAAY!
• ENLIVEN A ROAD TRIP
• INSPIRE A JOURNAL ENTRY
• IGNITE FAMILY DINNER CONVO
• SKYPE AND CONNECT LONG-DISTANCE
• KICK OFF A BUSINESS MEETING

Over the last few weeks, I've used them for:
  • Personal meditation
  • Journaling
  • The daily question at the Momma and Kiddo workout I lead
  • A surprise random act of kindness note on two of my friends door steps
  • Around the fire conversations

Dive in Deck comes in a cute, easily transported, durable case. The cards are all different and inspiring in their unique ways. One may resonate with you more than others do at any given time. That’s the great thing - pick a card and if it’s not right you have an abundance of choices.

I want to share with you how the cards inspired me and can inspire you. This was a journal entry that I found very meaningful and worth further thought:

“What adventure would you embark upon if there were no limitations?” 

I’m a small business owner in the making, stay at home mom/work at home mom plus volunteering 20 hours a week inspiring other moms. The adventure I would embark upon if there were no limitations is never owning a home or car and traveling the world to inspire others through movement and food.

Why am I not doing this? Is it fear? Am I not ready to take a risk? I haven’t quite figured it all out yet but I know what I want and now I know I can focus on how to get there.


“When do you feel most empowered?”

I feel most empowered after a great workout whether its a long run or yoga class, reading an inspiring non fiction book, or surrendering into a yoga training, festival, or retreat. I now know when I’m feeling like I need a reboot to choose one of these activities to spark the fire.

January is coming and this means it is a new year, a new you.

I’ve been working in the wellness industry for eight years now. I know January is the month most of us are focused on changing who we are and where we want to be. The Dive In Deck is a great tool to help you get there.

With the ladies I help, I plan to use these cards to ignite some deeper conversation and spike some motivation to make it past that point where most give up on their “New Year’s Resolution” and are back to where they have been for years.

The Dive in Deck brings back meaningful conversations, with yourself, your family and friends, your children and organizations.Order your Dive in Deck on their website for $20 and see where it leads you!
  
“You know that feeling you get in your soul when you experience face-to-face, heart-to-heart, meaningful connection with someone through conversation? It's just so... good. But in a world where "likes" and text messages have become the communication standard, we often fall into a pattern of small talk and meaningless chatter, boring our minds and isolating our souls. It happens. We totally get it.” 


We're very happy to be able to offer one of these decks to one of our US readers - keep reading to see how you can enter to win one of your own!


To enter the giveaway, you must leave a comment in this entry as instructed by the Rafflecopter below, then leave the name you commented under and your email in the box in the Rafflecopter entry. (This allows us to contact you if you win!) This will open up additional optional entries to increase your odds of winning.

This giveaway is open to US RESIDENTS ONLY and will end just before midnight ET on 1-12-16.

The winner will be notified by email within 24 hours after the end of the giveaway. In order to claim the giveaway prize, the winner will need to respond within 24 hours of notification, or an alternate winner will be selected.

Once the winner has responded and confirmed, their first name will be posted on our Giveaways page.

Good luck everyone!

a Rafflecopter giveaway


Monday, December 28, 2015

Review: Wet Shave Club for Women

4 comments:


Over a year ago, my fellow reviewer Michael shared his experience with Wet Shave Club - a shaving subscription box that encourages people to discover the clean shave provided by old-fashioned safety razors.  He followed up with a look at a second box, letting us all take a peek at what an ongoing subscription would be like.  Now, Wet Shave Club is making subscription boxes aimed at women, and I was fortunate enough to get to check them out.

When I received my first Wet Shave Club for Women box in the mail, I was expecting the advertised “first box” plus the starter’s equipment — the safety razor and the shaving brush.

However, the first box only arrived with a pink-handled safety razor (sans blades) and shaving brush, plus a leather thing to put over the top of the razor head to protect it.

I was impressed at the excellent quality of the materials that arrived, but it came with no razors, no soaps, nothing  that would allow me to use these.

I emailed the contact for the company and didn’t get a response (I attributed this to being over the Thanksgiving holiday, so I’ll forgive them), however the “first box” supplies did arrive a little later.  I am unsure if this was an error or the way the first box is shipped, but I would have preferred it all to arrive at the same time.

Though the box was labeled “Fine Women’s Shaving” on the outside, most of the items inside were clearly those designed for the men’s box: Mulled Hard Cider soap from Redbeard Brew Bars, The Sudsy Soapery’s TwiceMint Supercreamed Triple-Butter Shave Soap, Stirling Soap Co.’s Pre-Shave Soap, a bottle of Ellington’s Wide-Eyed Whiskey Aftershave, and a small packet of “Double-Duty Face Moisturizer”—along with a small box of 10 Crown razor blades. This is a well stocked box, but nothing here seemed specifically directed at me, a woman, other than the label on the outside of the box.


All the shaving products were of the artisanal handcrafted variety, but most had very typically “manly” scents—sandalwood, cinnamon, etc. The exception was the shaving soap, which had a light herbal minty scent. Again, I’m not sure if this was a mistake on the company’s part, or if it’s supposed to come with the men’s supplies.

I’ve only ever used the typical multi-blade razors with the disposable cartridge heads, marketed for use with the canned shaving creams, so shaving with the more traditional supplies took a bit of a different approach. For this experiment I decided I was going to neglect my shaving responsibilities for like a week and a half. For the sake of science, of course.

Generally speaking, women only shave to remove body hair. I was probably the best candidate to try this out, because my hair grows drastically differently in each “region” on my body. So I decided we’re going to go with the ladies’ general shaving pattern—legs, pits, and for the kids these days, “elsewhere”. I’m pretty low maintenance and don’t require anything fancy.
First, I don’t have a whole lot of leg hair, and what I do have is rather fine and only grows below my knee, so I can get away with a couple of half-assed swipes in the shower. The traditional wet shave, however, takes significantly longer and requires you to absolutely not be in the shower. The ladies have significantly more ground to cover, so allot extra time for this whole process. Thankfully, I won the genetic lottery and usually only have to shave my legs once a week.


So using these supplies means filling up the sink with hot water, using a washcloth, and wetting down the heretofore-unshaven plot, opening up the pores and softening the hair. I don’t have a shaving mug or bowl, though I suppose you could probably use a coffee mug. It didn’t come with instructions, so I was just winging it.

Then you soak the brush for a little bit in hot water, then swish it around in the shaving cream stuff until it’s sufficiently lathered and wipe it all over said plot.

The shaving cream in the kit was really nice, thick, and had a hint of minty freshness. It doesn’t have the same texture as canned shaving cream, but has plenty enough lather to get the job done.

This stuff is vastly superior to the crap in the can and probably lasts a lot longer.

The razors are the regular classic double-sided blades that you carefully insert into the head of the safety razor by unscrewing the handle and installing the blade. There aren’t like 17 of them stacked in a row, so you can sort of just swipe back and forth.

Don’t press down, like you would with a cartridge razor. I have read conflicting information about shaving with the grain or against the grain, or both. Well, I have too much ground to cover and not enough hair to be buggered by that, so I just went against the grain like normal. Nothing blew up, and I didn’t get any razor bumps or cut myself.

Ok, so now we move on to the pits. My hair is a little bit darker and thicker here and grows a bit faster. It also grows in like 18 different directions, so I have to switch directions a couple of times. No fuss, no muss.
Now for the piece de resistance. First off, I don’t clear the whole shebang. Apparently I’m still stuck in the 90s, so keeping the hedges trimmed and in order is all the maintenance I require. But for all the ladies out there that do the whole nine from bow to stern on the daily, I pour my heart out to you and sacrifice my bush on the altar of science in the name of dispassionate inquiry. (You’re welcome.) 

This area is significantly darker, thicker, and like a dude’s beard, so for this I must ironically turn to the experts at “The Art of Manliness” on “How To Shave Like Your Grandpa” for more information. I looked for more information on the Wet Shave Club’s blog, “TheManliest”.  For those of us who grew up on disposable razors (and that's anyone younger than Grandpa), clearly findable basic instruction is a must.


So back to my experiment - I do the moistening and slapping on of the cream (again, you’re welcome), then shave with the grain. This is not so terrible, though it takes a bit of plowing. Then I do the wipe down and all that, again with the cream, and do the whole thing in reverse.

I expected my skin to catch on fire, but I actually didn’t get any razor bumps with this method.

On to the aftershave. Thankfully I do like the manly scents of sandalwood, etc., but this will probably be a product that most women are entirely uninterested in applying to their bodies, especially in their nether regions.

However, I wanted to test the products, and I found the prospect of aftershave intriguing. It’s got a little Worcestershire sauce-opening thing at the top, so I sprinkle it all over my hands and do the best Lectric Shave commercial imitation that I can.

It’s nice stuff and I think its purpose is like an astringent to calm your skin down, but it would probably be a good idea to include instructions for those of us who don't shave our faces, and get a floral or herbal scented one in a bigger bottle for the ladies. That would be kinda cool, and you might avoid the third degree from any Gentleman Caller you may have.


I totally forgot about the pre-shave soap, but I used some of it and it’s really soothing and kind of lotion-y feeling, so I’m going to wait until next time and try it out. The Red Beard soap is nice for the shower, but again, its scent is more of a “manly” smell. The "Double Duty Face Moisturizer lotion, while nice, is definitely NOT enough in quantity for even one application to your legs - again, just right for someone who shaves their face, but we women have a lot more surface area to deal with.  


I might suggest to the company to include more feminine scents, or “unisex” scents, or a choice of a few types of scents to include in the box when you first sign up. Like “floral”, “sweet”, “herbal”, etc., that way it can appeal to more women. Maybe include instructions, or at least have instructions on the blog or FAQ, because most women will probably be like me and have no clue how to shave with an antique-style safety razor, which was designed for use by men on their faces.

Since women shave to remove body hair, perhaps Wet Shave Club can find a more creative and practical way to remove so much hair that’s more tailored to a woman’s needs.

While the quality of the shave was noticeably better, the process, in my opinion, is cumbersome and just takes too long to be of use to most women.

Honestly, the Wet Shave Club is far better suited for men. The women’s box feels a little bit like a consolation prize.

When you go to the WetShave Club website and click on the link to the online shop, it even says, “We are Wet Shave Shoppe, and we deliver fine grooming goods for men. Welcome!” The products are of an excellent quality, but they’re men’s products. As much as I enjoyed trying out this process, a Wet Shave Club subscription would make a much better gift for a man in your life.    



Wednesday, December 23, 2015

Marshmallow & Walnut Bark

7 comments:

I recently experimented with some homemade easy chocolate barks and as I was trying out the Cookies'N'Cream bark with my son, I came up with another idea: Marshmallows (something my son loves too much for his own good) and Walnuts (I love walnuts!).

We had so much fun experimenting together and combining what we each like to make something delicious.  

It's quick enough to make that you still have time to create a batch, divide it into smaller portions in a baggie or small container, and tuck into stockings, or keep on hand as favors for holiday visitors!

This recipe is super simple (even if you don't own a microwave) and definitely something that you can do with kids without making a huge mess!

Marshmallows & Walnut Bark

Ingredients:
2 cup dark chocolate morsels (or semi sweet chocolate morsels)
3/4 cup mini marshmallows
½ cup chopped walnuts
1/3 cup white chocolate morsels

Items you will need:
  • cookie sheet lined with tin foil
  • small pot with some water in it and a metal bowl (or a microwave safe dish)
  • rubber or silicone spartula
  • spoon, piping bag or zip lock bag
Makes approximately 1/2 cookie sheet of Marshmallow-Walnut Bark.

Prep time: 5min
Cook time: 5min
Cool time: 20min

Total time: 30min

Step one:
Line your cookie sheet with tin foil, set aside.  Pour the dark chocolate morsels into the metal bowl (or microwave safe dish).

Step two:
Mix your marshmallows and walnuts together in a separatebowl, put aside.

Step three:
Melt the dark chocolate morsels in a double boiler (pot with hot water on stove, metal bowl placed on top) or in the microwave (10 second intervals, stirring in between).

Step four:
Once the dark chocolate morsels are completely melted, add about 2/3 of the marshmallow and walnut mixture and stir until everything is well combined and chocolate covered.

Step five:
Spread the marshmallow-walnut-dark chocolate mixture on the cookie sheet, approximately ½ inch thick, then place bowl back on double boiler and add the white chocolate morsels, so that they also melt.
(it's okay if it mixes with the dark chocolate leftovers).

Step six:
While the marshmallow-walnut-dark chocolate mixture is still melted sprinkle it with the remaining marshmallows and walnuts.

Step seven:
Drizzle with melted white chocolate.
You can either use a spoon and just drizzle all over or use a piping bag (or zip lock bag instead of piping bag). 

Step eight:
Place cookie sheet in the fridge for at least 20min.


Step nine:
Take the marshmallow-walnut bark off the cookie sheet and break it into smaller pieces.


ENJOY! :)

Monday, December 21, 2015

Review: Airship Notebook

3 comments:

A staple in any artist's collection is a sketchbook. I used to carry one with me everywhere I went - when inspiration struck, so would my pencil! It has been well over ten years since that has been the case, though.

I have been yearning to draw, and paint more, and just like that, the opportunity to review an Airship Notebook came up!

Airship Notebooks supply artists with notebooks, sketchbooks, and other tools to help anyone achieve creativity, great for writers and artists.

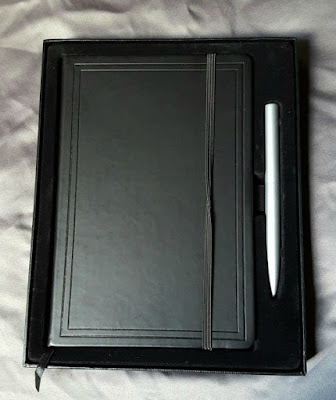
The Airship sketchbook is made for mixed media art and boasts a black leather hard cover,  100 recycled blank white pages, an elastic loop for a pen or pencil, an elastic band to keep the book closed, and a black ribbon to use as a bookmark.

There is also a pocket attached to the back cover of the sketchbook. The sketchbook is 5.8"x8.3".
The gift set I got in the mail came from their store on Amazon in a nice black gift box with velvet lining included the sketchbook and a silver pen with black ink.


When I first opened The Airship Notebook I noted the pen seems of nice quality,  weighty without being heavy.

The pages of the sketch book are bright white and have a good texture, commonly referred to as 'tooth'. This is important because it prevents smudging and feels great to draw, or write on.


I sat down to draw for the first time in what felt forever.  I was actually nervous.  What if I can't draw,  or it looks bad,  or I can't think of what to draw! Don't worry,  it came to me, one page at a time.

First I drew in pencil.  This is safe and comfortable for me.  I can erase what I don't like! I wanted to feel the texture of the page while drawing,  and see if I could intentionally smudge where I  wanted,  or keep sharp where I wanted.


Mission accomplished. Roses over water complete, smudging was easy,  keeping lines sharp was as well.
The next night I decided to be bold and use the pen that came in the set. I enjoyed learning about this pen- using it straight on as usual created a solid dark line,  but angling the pen made the stroke look more like a pencil mark. 


All was smooth,  until I noticed a dark mark.  The pen had bled slightly, then again, and again.  I used this to my advantage where I wanted the drawing very dark,  but it also happened in other areas, where I definitely did not intend. As I was using this drawing as a test run of the pen I was not upset,  though I may have been if I was going for precision.

I used the pen again, but this time with water color and marker. An emotional drawing.  No sketchbook goes without at least one of these, at least none of mine
 
All in all, I am very happy with the Airship Notebook.  I love how professional it looks and feels. I would recommend this to any artist from professional to beginner!
Visit Airship Notebook on Facebook and Twitter for a glimpse into other artists' drawings, and tips and hints. To purchase an Airship Notebook,  go to Amazon.com where you can pick one up for $19.99.


Thursday, December 10, 2015

Awesome Life Friday #46

5 comments:
Welcome to Awesome Life Friday!

We're so looking forward to seeing what you've been cooking, creating, growing, decorating, reviewing, giving away, and thinking about this week!

You may have noticed that we've begun co-hosting another link up - Party in Your PJs!  It will be starting on Tuesday evenings, and running through Saturday.  I hope you'll join us there as well!

This week, I'm on the road headed to Florida to spend some time with my husband's family, so we're going to save Features for next week's party.  I'll be peeking in as I can, though - I can't wait to see what you've brought to share this week!


Thank you all so much for sharing your awesomeness!

Are you all ready to party?  If you like, we'd love it you'd help spread the word by grabbing our button:


Here we go!


Wednesday, December 9, 2015

Salt Dough Holiday Ornaments

12 comments:

With a husband in the military, we aren't always able to spend our holidays together with the rest of the family. My family lives in Germany (a 12hour non stop flight away and a long and exhausting trip to and from airports) and his in Oregon (a 16-18hour drive away). 

This year we made the decision to stay at home because, to be honest, as much as I love seeing family, a flight to Germany for the whole family is just not in the budget and just the thought about keeping a high energy kindergartner and crazy toddler busy in the car for such a long drive had my stomach in a twist. So, staying in the wonderful Mojave desert it is (sarcasm).
However, I don't want our families to miss out on how the little ones have grown and we want to send them a “piece” of us. Here I was, thinking and coming up with giant ideas about picture collages, etc but then the simplest idea came to my mind: Salt Dough Ornaments!

I remember when I was little we did this in kindergarten as a gift for our parents and grandparents for the holidays – I know my grandma still hangs the hand print of 4 year old me on her holiday tree every year!

So I spent an entire afternoon Skyping with my grandma until she remembered her salt dough recipe

The Recipe:
2      cups   flour
1/2  cup     salt 
3/4   cup     warm water

Bake at 300F for 30min.
  
I was very positive surprised by how cheap the ingredients were! At my local Commissary, I payed $1.89 for a 5lbs bag of flour, $0.90 for 1lb 10 oz of salt which makes a batch of Salt Dough approximately $0.44!!

Salt Dough Ornaments

Here is what you will need:
  • flour
  • salt
  • warm water
  • food coloring (optional)
You will also need the following items:
  • a mixer (optional)
  • a knife
  • cookie sheet lined with parchment paper
  • a wooden spoon, pencil or small round cake decorating tip
  • a roll pin
  • paint (you can use water colors, markers, acrylic paint, finger paint, nail polish, etc.)
  • paint brushes
  • cookie cutter (optional)
Step 1:
Preheat your oven to 300F.
Get your dry ingredients together and mix them up good.

Step 2:
Add your water and food coloring if you want your dough to have a certain color, then mix it all well, if your dough is too dry then add another 2tbsp of water!

Step 3:
Kneed the dough by hand for a little bit to make sure it's really all well combined, then roll it out approximate 1/4 inch thick on a slightly floured surface.

Step 4:
Make hand and/or foot prints or just simply use a cookie cutter to make a shape.

Step 5:
Making the holes: I came up with two ways to do that.
 

The first one would be to use the end of a wooden spoon or the tip of a pencil to poke a hole or the second way (I prefer that one) is to use a cake decorating tip and poke a hole in it.

Step 6:
Put them on the cookie sheet and bake them for 30min (they should be dry and harder but not brown or burned).

Step 7:
Let them cool completely and then get creative :)  

Step 8:
Paint them, write on them, let the kids get messy, whatever you want! 


My kids and I had so much fun making these that I am sure we are going to make this a new holiday tradition now; and the big plus for all the parents out there: I kept them busy for an entire afternoon and everything they didn't paint I painted once they were asleep.

Happy Holidays everyone!